Wednesday, 29 October 2025
Week 3- What is a Match Cut?
Week 3 - What is an L-CUT? How does it affect sound?

Video editing is much more involved and difficult than simply arranging the video clips into a specified order. Instead you have to bring those audio and video tracks together in a way that fits the purpose you want, which is often to let the audience absolve themselves into the work without being focused on the technical choices. This means that often times the audio video blocks will not always match up perfectly as you will need to stagger them in an effort to create a flow. This does not mean that you are going to separate the audio from its source, but instead let it lead or follow in the sequence.
This video editing technique is often called an L cut.
Using an L Cut The L cut video editing technique is a transition that is used between two clips. Simply put, this is where the audio of a previous clip extends into the video of a second, or the audio of the second occurs on the first clip before the second clip comes into the video. This does not remove the audio sync, but instead simply extends or shortens the audio as it relates to that clip. When you are editing with an L cut you may choose to have a series of video clips between two people talking.
On one clip you will have one person speaking, and the clip after it will be the second person. If you are going to use the L cut video editing technique to provide an editing transition then you may have the first person finish speaking and then provide a little bit of space afterward. Cut the audio from the first clip back to where they finished speaking and start the audio from the second clip here. Let the still space of that person sit for a little bit over that audio before letting it transition over to the video of the second clip. This does not affect the video clips themselves, but can instead simply smooth out the editing transitions between the clips and allow the audience to stay focused.
Week 3 - Editing -What is a montage?
Week 3 - The history of cutting film
Battleship “Potemkin”, Odessa Steps excerpt (Sergei Eisenstein, 1925) from Soviet Film, Grinnell on Vimeo.
As you can see, it’s a powerful piece of propaganda. There is no way to come away from this movie and not feel like the Czarists are anything but murderous villains. (Nevermind that the movie is wildly inaccurate, historically speaking.) Shots of a grieving mother juxtaposed with images of bayonet wielding troops result in a surprisingly visceral feeling of injustice. In his writings, Eisenstein outlined the varying types of montage – five kinds in all. The most important, in his eyes, was intellectual montage – a method of placing images together in a way to evoke intellectual concepts. He was inspired by how Japanese and Chinese can create abstract ideas from concrete pictograms. For example, the Japanese symbol for tree is 木. One character for wall is 囗. Put the two together, 困, and you have the character for trouble, because having a tree in your wall is certainly a huge pain in the ass. You can see an example of intellectual montage in the end of the Odessa steps sequence when a stone lion seemingly rises to his feet. Eisenstein decided to push this idea to the limit with his follow up, October. The movie is deeply strange to watch now. In one famous sequence, Eisenstein compares White Russian general Alexander Kerensky to a peacock and to a cheap Napoleon figurine. It’s proved to be an interesting intellectual exercise but one that left audiences, both then and now baffled. And below is another, slightly funnier, certainly more contemporary, example of intellectual montage.
Week 3 -Editing Terms
cut A visual transition created in editing in which one shot is instantaneously replaced on screen by another.
continuity editing
Editing that creates action that flows smoothly across shots and scenes without jarring visual inconsistencies. Establishes a sense of story for the viewer.
cross cutting
Cutting back and forth quickly between two or more lines of action, indicating they are happening simultaneously.
dissolve A gradual scene transition. The editor overlaps the end of one shot with the beginning of the next one.
editing The work of selecting and joining together shots to create a finished film.
errors of continuity Disruptions in the flow of a scene, such as a failure to match action or the placement of props across shots.
establishing shot A shot, normally taken from a great distance or from a "bird's eye view," that establishes where the action is about to occur.

eyeline match The matching of eyelines between two or more characters. For example, if Sam looks to the right in shot A, Jean will look to the left in shot B. This establishes a relationship of proximity and continuity.
fade A visual transition between shots or scenes that appears on screen as a brief interval with no picture. The editor fades one shot to black and then fades in the next. Often used to indicate a change in time and place.
final cut The finished edit of a film, approved by the director and the producer. This is what the audience sees.
iris Visible on screen as a circle closing down over or opening up on a shot. Seldom used in contemporary film, but common during the silent era of Hollywood films.
jump cut A cut that creates a lack of continuity by leaving out parts of the action.

matched cut A cut joining two shots whose compositional elements match, helping to establish strong continuity of action.
montage Scenes whose emotional impact and visual design are achieved through the editing together of many brief shots. The shower scene from Psycho is an example of montage editing.
rough cut The editor's first pass at assembling the shots into a film, before tightening and polishing occurs.
sequence shot A long take that extends for an entire scene or sequence. It is composed of only one shot with no editing.
shot reverse shot cuttingUsually used for conversation scenes, this technique alternates between over-the-shoulder shots showing each character speaking.
wipe Visible on screen as a bar travelling across the frame pushing one shot off and pulling the next shot into place. Rarely used in contemporary film, but common in films from the 1930s and 1940s.
Week 3 -Editing tech--What is a CODEC?

Codec is really the meshing of two words: coder and decoder (co/dec). What do they do? In the simplest explanation, codecs encode and compress streams of data for storage or they decompress for playback or even editing.
A codec is usually a small piece of computer code that performs its magic whenever it's called by a piece of software, but a codec can also be a physical piece of hardware responsible for turning analog video and audio into a digital format. This happens in real time, either at the point of capture or the point of playback. The codec can also perform the reverse function, turning digital video and audio signals into an analog format. If you're not working as a broadcast engineer, however, you will most likely be using a computer codec to compress your video and audio data into a more manageable size for viewing, transfer or storage.
Types of Codecs
Now that you know what codecs do and why they're used, let's look at the variety of codecs that are out there and which ones might best fit your needs.There are a couple of umbrellas under which to group a variety of codecs. Lossless codecs are just like they sound. They reproduce video exactly as it is without any loss in quality. Lossy codecs, however, lose varying amounts of information but reproduce the compressed material using less data space. Lossy codecs are great for compressing data that needs to be sent via e-mail or uploaded to the internet for streaming.
Transformative codecs cut up the material into manageable chunks before actually compressing it, and predictive codecs compare the data you're compressing with adjacent data and then get rid of unnecessary data in order to maximize space. Overall, these codecs all work toward the same end: putting your data into a manageable file type with as little loss of information as possible.
Many different codecs fall under these four basic codec types. The most widely recognized family of codecs is based on MPEG standards. MPEG is an acronym for Moving Picture Experts Group. This is the organization that sets and codifies the standards. There are three primary MPEG formats and a multitude of derivative types.

Almost all computers and consumer DVD players support both MPEG-1 and the MP3 digital audio encoding formats. One drawback is that MPEG-1 allows only for progressive scanning. Progressive scanning is a method of storing and displaying moving images where all of the lines of the image are drawn in sequence. This is in contrast to interlaced scanning, where all the odd lines of an image are drawn first, then all of the even lines are drawn. MP3, on the other hand, while lossy and quite small, is the standard for nearly all digital music storage devices, audio players and retail sites. The typical MP3 audio file is created at 128kbits per second, which is around 1/11th of the size of the original audio data that would be on a CD.
MPEG-2 is a very high standard and the only video compression standard used for DVD-video compliant discs. Even though new codecs have been introduced which compress at a higher quality, MPEG-2 is still the standard for DVD production, and it is also an option for Blu-ray Disc creation.
MPEG-4 handles both progressive and interlaced video. It employs better compression techniques than MPEG-2 and, like MPEG-2, it is a widely-accepted compression standard. In fact, there are a number of codecs that are derived from MPEG-4. One of them is the H.264 codec, which is another option for encoding video for Blu-ray Disc, as well as for videos found on the iTunes store. H.264 is a family of standards with great flexibility and a wide variety of applications. H.264 enables compression for high and low bit rates and both high and low video resolutions. Adjusting size allows users to use this same standard for compressing for broadcast, multimedia usage and large file storage.
WMV
Another well known codec or family of codecs is WMV, which stands for Windows Media Video. With the glut of Windows users out there, it's no wonder this codec family is so popular.Originally designed to compress files for internet streaming, WMV was introduced as a competitor to the RealVideo compression codec. Microsoft's WMV 9 has been around for quite some time at this point, and Microsoft claims that it provides a compression ratio that is two times better than MPEG-4 and three times better than MPEG-2. WMV 9 is also the basis of the SMPTE VC-1 video compression standard, which is another format that can be used for encoding video for Blu-ray Disc.
A widely-used codec is the DV codec, which utilizes both raw video and audio data. The popular Mini DV format uses DV25, which runs at 25 megabits per second. When the video is captured to a computer running Windows, it will typically be written to an AVI file; on a Mac, it will typically be written to a QuickTime file. AVI and QuickTime are "containers". The data inside the container is pretty much the same.
So what is a container? The name says a lot. A container is kind of like the wrapping on a present. It refers to the way in which information is stored, but not necessarily how it is coded. For example, QuickTime is a container that wraps around a variety of compression codecs, like MPEG-4, k3g, skm and others.

Friday, 3 October 2025
Week 2-The Screenplay
The Screenplay
Humans have an almost unreasonable and insatiable craving for stories. They surround us night and day, every day of the week. The stories. At home, work, school, parties, malls, diners… People are always narrating and listening to anecdotes and chronicles. It may be something as notorious as the Madoff scandal or as trivial as a mean cab driver who refused to give the right change. Regardless of their nature, relevance, or truthfulness, stories have permeated society. And we love them. Movies tell stories, so we love them as well. In filmmaking, the story is first developed in the screenplay. Every movie, short or feature, starts with a script – the blueprint for the construction of the motion picture. The screenplay furnishes the framework for every movie production; it is the basis for the decisions made from the early stages of pre-production to the final phase of post-production.
The Process
Writing a screenplay is no easy task, especially for features. Those blank sheets of paper are intimidating. Characters, locations, plot, genres… The variables are one too many. Attempting to follow a current trend is usually a big mistake and a waste of time. Today’s gold is tomorrow’s trash. Plus, after you take the time to write and sell it, the producers will take from several months to a few years to actually finish the movie. By then, there will be another demand in town. If you have an original story that is remarkably executed, buyers will come sooner or later. Rule #1 is to be true to yourself. Don’t write a screenplay because you think it will sell, and you need money. Write it because you love the story and characters. Write it because you want to entertain or instruct or move an audience.
The Rules
Screenwriting has no hard and fast rules, not even the one mentioned above, so ignore it if you want. Writing for the screen is a subjective craft in which anything might work, but probably nothing will. William Goldman said: “Nobody knows anything.” That is the greatest truth in the business. However, in the absence of rules, we’re left with the norm – a set of guidelines that has proved valuable and efficient throughout the years of filmmaking. The main concepts to fathom are: the 3-act structure and character arc. Those two are standard in the industry, followed practically by every movie, both commercial and independent. Another nugget of knowledge is high concept, though those are much rarer to find.

Week 2 - Main Characters in a movie

Movies tell stories about people. In every script, the writer has to create one character (or a set of characters) that the audience will root for or hate. This special character is known as the main character, often referred to as the protagonist. He or she will be the character with most obstacles and normally the one with most screen time.

Creating interesting, realistic characters is an art in itself. To find the right dose of believability and novelty to mix together and form an exciting, plausible character ranks as one of the hardest tasks in screenwriting.
Decades ago, the norm demanded main characters to be good guys on the right side of the law, like James Bond or Will Kane. Nowadays, however, the writer has enormous freedom to use anti-heroes or even crooks as their main characters. Ocean’s Eleven (1960, 2001), for instance, romanticizes the criminals and turns them into the protagonists.

Scripts can be categorized by the number of main characters they present. The next section examines the most common possibilities:
One Main Character
Although most screenplays count dozens of characters, as a general rule, the story revolves around only one character. Even romances, in which the story wouldn’t exist without the significant other, have just one main character. Love Story (1970), for instance, opens with Oliver Barrett IV, alone, mourning the loss of his loved one. He is the character that faces more physical and psychological challenges throughout the movie.

In other movies, the true main character is overshadowed by secondary characters until the time comes for the protagonist to reach his intended purpose. This happens in Francis Coppola’s The Godfather (1972), which opens with a frantic pledge to Don Corleone ( Marlon Brandon), one of the heads of the Italian mafia in New York. At the movie’s very beginning, his son, Michael Corleone (Al Pacino) seems like a minor role. In fact, he is considered by other mafia families as a “civilian” disinterest in mob business. Only when Don is murdered, is Michael dragged into his dad’s affairs as a mobster.

Two Main Characters
“Buddy” movies are the ones mostly likely to contain equally important characters. Butch Cassidy and the Sundance Kid (1969) is the classic example that tells the story of two outlaws that live, work, run, and die together. They complete each other. Whereas Sundance is deadly with guns, Butch has never shot anyone. Whereas Butch is sociable and talkative, Sundance is unfriendly and laconic. But in spite of their differences, they both share sheer pleasure in exploding train vaults.
Thelma and Louise (1991), labeled by some a modern version of Butch Cassidy and the Sundance Kid, is also another great example of a “buddy” movie with two main characters that roughly share the same amount of screen time and story relevance.

Other examples of 2-main character movies are: Lethal Weapon (1987)

Ensemble Cast
Rare movies successfully sell the illusion of having more than two main characters. Little Miss Sunshine (2006) is a great exception to the rule, and one that excels with refreshing artfulness and humor. It tells the story of a dysfunctional family forced together into the family RV as they travel to Redondo Beach for a beauty pageant. The characters are so meticulously elaborated that each one has their own arc. Unity is supplied by the RV bus that takes them to California and family ties.
Oceans 11

Week 2- The 3 act structure

The 3-act structure is a very old maxim widely adhered to in storytelling and fiction writing today. It can be found in plays, poetry, novels, comic books, short stories, video games, and the movies. It waspresent in the novels of Conan Doyle, the plays of Shakespeare, the fables of Aesop, the poetry of Aristotle, and the films of Hitchcock. It’s older than Greek dramaturgy. Hollywood and Broadway use it well. It’s irrefutable and bullet-proof, so to speak.
Act I: The Setup
The first act is where all the major characters of the story are introduced, plus the world where they live in, and the conflict that will move the story forward. In Act I, the writer has the freedom to create any setting and reality that he so wishes. It’s in the first pages of the script that he defines the reasoning and logic of the story. This early in the script, anything is possible. Act 1 ends with inciting incident or a plot point.Inciting Incident
The inciting incident is the event the changes your character life forever and propels him to act and do something that he does not want to do. At this point the story begins in the film.Act II: Confrontation
The second act is by far the longest, encompassing half of the movie and taking place between the first and third acts. For some screenwriters, Act II is the hardest one to squeeze out. This happens because after the initial boost of a new story, the writer is left without plot elements to introduce. The story, its characters and conflict are all established. Act 2 sees your character fight his way through obstacles to achieve his wants and goals. In the middle of act 2 is the mid point. Act 2 ends with a plot point called the climax.Mid Point
The mid point in act 2 is not really in the middle exactly but its basically a point where your character goes through a challenge that will change him or his goals. This point we also see how far he is willing to sacrifice for the cause, the hero is on the fence and do not know what to do, the stakes get higher. This point may also change the course of the story. A decision is critical.Act III: Resolution
The last act, Act III presents the final confrontation of the movie, followed by the dénouement. This act is usually the shortest in length because quickly after the second turning point of the script, the main character is face to face with the villain or just about. Showdown ensues and then conclusion.Week 2 - What is a Screenplay?
What is a Screenplay?
In the most basic terms, a screenplay is a 90-120 page document written in Courier 12pt font on 8 1/2" x 11" bright white three-hole punched paper. Wondering why Courier font is used? It's a timing issue. One formatted script page in Courier font equals roughly one minute of screen time. That's why the average page count of a screenplay should come in between 90 and 120 pages. Comedies tend to be on the shorter side (90 pages, or 1 ½ hours) while Dramas run longer (120 pages, or 2 hours).A screenplay can be an original piece, or based on a true story or previously written piece, like a novel, stage play or newspaper article. At its heart, a screenplay is a blueprint for the film it will one day become. Professionals on the set including the producer, director, set designer and actors all translate the screenwriter's vision using their individual talents. Since the creation of a film is ultimately a collaborative art, the screenwriter must be aware of each person's role and as such, the script should reflect the writer's knowledge.
For example, it's crucial to remember that film is primarily a visual medium. As a screenwriter, you must show what's happening in a story, rather than tell. A 2-page inner monologue may work well for a novel, but is the kiss of death in a script. The very nature of screenwriting is based on how to show a story on a screen, and pivotal moments can be conveyed through something as simple as a look on an actor's face. Let's take a look at what a screenplay's structure looks like.
The First Page of a Screenplay
While screenplay formatting software such as Final Draft, Movie Magic Screenwriter, Movie Outline and Montage frees you from having to learn the nitty-gritty of margins and indents, it's good to have a grasp of the general spacing standards.The top, bottom and right margins of a screenplay are 1". The left margin is 1.5". The extra half-inch of white space to the left of a script page allows for binding with brads, yet still imparts a feeling of vertical balance of the text on the page. The entire document should be single-spaced.
The very first item on the first page should be the words FADE IN:. Note: the first page is never numbered. Subsequent page numbers appear in the upper right hand corner, 0.5" from the top of the page, flush right to the margin.
Screenplay Elements
Below is a list of items (with definitions) that make up the screenplay format, along with indenting information. Again, screenplay software will automatically format all these elements, but a screenwriter must have a working knowledge of the definitions to know when to use each one.Scene Heading
Indent: Left: 0.0" Right: 0.0" Width: 6.0"
A scene heading is a one-line description of the location and time of day of a scene, also known as a "slugline." It should always be in CAPS.
Example: EXT. WRITERS STORE - DAY reveals that the action takes place outside The Writers Store during the daytime.
Subheader
Indent: Left: 0.0" Right: 0.0" Width: 6.0"
When a new scene heading is not necessary, but some distinction needs to be made in the action, you can use a subheader. But be sure to use these sparingly, as a script full of subheaders is generally frowned upon. A good example is when there are a series of quick cuts between two locations, you would use the term INTERCUT and the scene locations.
Action
Indent: Left: 0.0" Right: 0.0" Width: 6.0"
The narrative description of the events of a scene, written in the present tense. Also less commonly known as direction, visual exposition, blackstuff, description or scene direction.
Remember - only things that can be seen and heard should be included in the action.
Character
Indent: Left: 2.0" Right: 0.0" Width: 4.0"
When a character is introduced, his name should be capitalized within the action. For example: The door opens and in walks LIAM, a thirty-something hipster with attitude to spare.
A character's name is CAPPED and always listed above his lines of dialogue. Minor characters may be listed without names, for example "TAXI DRIVER" or "CUSTOMER."
Dialogue
Indent: Left: 1.0" Right: 1.5" Width: 3.5"
Lines of speech for each character. Dialogue format is used anytime a character is heard speaking, even for off-screen and voice-overs.
Parenthetical
Indent: Left: 1.5" Right: 2.0" Width: 2.5"
A parenthetical is direction for the character, that is either attitude or action-oriented. With roots in the playwriting genre, today, parentheticals are used very rarely, and only if absolutely necessary. Why? Two reasons. First, if you need to use a parenthetical to convey what's going on with your dialogue, then it probably just needs a good re-write. Second, it's the director's job to instruct an actor on how to deliver a line, and everyone knows not to encroach on the director's turf!
Extension
Placed after the character's name, in parentheses
An abbreviated technical note placed after the character's name to indicate how the voice will be heard onscreen, for example, if the character is speaking as a voice-over, it would appear as LIAM (V.O.).
Transition
Indent: Left: 4.0" Right: 0.0" Width: 2.0"
Transitions are film editing instructions, and generally only appear in a shooting script. Transition verbiage includes:
- CUT TO:
- DISSOLVE TO:
- SMASH CUT:
- QUICK CUT:
- FADE TO:
Shot
Indent: Left: 0.0" Right: 0.0" Width: 6.0"
A shot tells the reader the focal point within a scene has changed. Like a transition, there's rarely a time when a spec screenwriter should insert shot directions. Once again, that's the director's job.
Examples of Shots:
- ANGLE ON --
- EXTREME CLOSE UP --
- PAN TO --
- LIAM'S POV --
Week 2 -Writing Your First Screenplay
How you present your script is the equivalent of how you would present yourself for a job interview. I am assuming this is the best you can do or be.

Formatting and Software
Nearly all script writing programs like Screenwriter and Final Draft come with templates already installed. There are a number of free applications and a number of not-free applications. As your career advances, you may switch from one to another.Celtx (link is external) is a free screenplay writing software (the plus version is $15 and includes some extras like clip art and the ability to customize your desktop). Celtx includes a number of templates not just for screenplays, but also A/V scripts and radio plays.
Trelby (link is external) is also free software which includes not only templates but more than 200,000 names from numerous countries which can help if you're stuck for a character name.
Final Draft (link is external) is the best selling screenplay writing software – clocking in at $250, it's not cheap, but it boasts “for the last 20 years, nearly every film and TV show has been scripted with Final Draft software.” There's a free trial version as well as templates for different types of script and even special pricing for non-profit producers.
Movie Magic Screenwriter (link is external) In a similar price bracket is Movie Magic's Screenwriter, with an MSRP of $250. Happy users of Movie Magic Screenwriter include Paul Haggis, the screenwriter of Crash and Million Dollar Baby and also Jon Cassar the director and co-executive producer of many thrilling TV shows including 24.
Length, Structure and Story
Typically one page of script equals one minute of screen time – this is what people will be expecting when they read it; a 60-minute script means a one-hour show. Most dramatic movies and TV shows are based upon the three-act structure – this means that the action can be divided into three parts:- Act 1 – The Setup
- Act 2 – The Conflict and Confrontation
- Act 3 – The Resolution
After years of opening thousands of envelopes and reading thousands of scripts, Carpenter talks of some of the most annoying pitfalls she's seen and warns of not properly following the story structure:
“If you are only writing a script because you have a cool scene you want to shoot, put it back in the drawer unit you have something to say that the scene will fit into because it will have no meaning without context. Three act story structure works, even if you cut it up and toss it in the air and rearrange it to do a flashback movie like Memento. You must have SOMEWHERE in your story a setup, an encounter or conflict and a resolution. Something must happen. Your characters must have an arc. Your story must have an arc. Or not...and no one will care.”

Week 1- Understanding Color Temperature (article + video)
Colour Temperature Chart
Colour temperature is a standard method of describing colours for use in a range of situations and with different equipment. Colour temperatures are normally expressed in units called kelvins (K). Note that the term degrees kelvin is often used but is not technically correct (see below).
Technically speaking...
Colour temperature means the temperature of an ideal black body radiator at which the colour of the light source and the black body are identical. (A black body is a theoretical radiator and absorber of energy at all electromagnetic wavelengths.)Colour Temperature in Video
For video operations the relevant temperatures range from around 2,000K to 8,000K — these are common lighting conditions. In practical terms this usually means selecting lights, gels and filters which are most appropriate to the prevailing light or to create a particular colour effect. For example, a camera operator will select a "5600K filter" to use outside in the middle of a sunny day.Terminology
- When referring to the unit kelvin, it is not capitalised unless it is the first word of a sentence. The plural is kelvins (e.g. "The light source is approximately 3200 kelvins").
- The symbol is a capital K (e.g. "The light source is approximately 3200K").
- When referring to the Kelvin scale, it is capitalised (e.g. "The Kelvin scale is named after William Thomson (1824 – 1907), also known as Lord Kelvin".
Degrees kelvin
According to the The International System of Units (SI), colour temperatures are stated in kelvins, not in degrees Kelvin. The "degrees" part of the name was made obsolete in 1967. However, the "degrees" reference has remained in common use in media industries.Week 1- Depth of Field (article)

How to control the depth of field so your subject stands out sharply.

What is Depth of Field?
Depth of field is the area of an image that appears in focus. Camera settings, the amount of light and your equipment's technical specifications are all factors that can impact depth of field, making it deep or shallow.First, it is important to understand that whenever a lens is involved, there is only one plane of exact focus. There is, though, an area of acceptable focus in front of and behind this plane. In a shallow depth of field, only the subject and a small area in front of and behind it will be in sharp focus. A deep depth of field results in objects farther away from the focus plane lying within acceptable focus range

Controlling the depth of field allows you to make your subject stand out sharply from the background, or to put as much of the shot as possible in focus. For example, when shooting your son playing violin in the midst of the string section, you may want him to stand out from the rest of the orchestra. On the other hand, you might want the entire orchestra to be in focus, which may not be a trivial task in low-light situations. Most consumer-level camcorders have very deep depths of field in most shooting situations.
What Affects Depth of Field?
While there are many ways to alter your camcorder's depth of field, there are really only two variables that determine depth of field: focal length and aperture. Focal length is a function of your camcorder's lens and is changed when you zoom in or out on a subject. You can, therefore, easily change the depth of field of your shot by simply zooming. The aperture, on the other hand, is a bit more complicated to control, but is easy to understand. The aperture or iris simply controls how much light gets into your camcorder. You can manually control aperture settings, but the shutter speed and the amount of light in a scene will always be an influence on these settings as well.
Focal Length
Let's begin by examining focal length. The focal length of your lens directly affects depth of field. When shooting a wide angle shot, the focal length of the lens is relatively short and will have a deeper depth of field. If you zoom in, the focal length gets longer, and the shot will have a more shallow depth of fieldIf you want your subject to stand out in a crowded scene, you could use a long focal length lens, thereby decreasing the depth of field and making your subject the only area of focus. A lens with a short focal length is typically called "wide-angle" and a long focal-length lens is known as a "telephoto." In other words, when you are zoomed in, your lens has a longer focal length and therefore has a more shallow depth of field. Subject distance from the lens and from the background also plays a part in depth of field
For example, decrease the distance between the camera and your subject and more of your shot will be in focus. To have only your subject in focus, increase the distance between your subject and the background, allowing the background to fall out of the depth of field.

Aperture (Iris)
The aperture setting determines the size of the opening (iris) that lets light through to the CCD. A small aperture setting results in a deeper depth of field and a large aperture setting provides a shallow depth of field. Say, for example, that you're shooting a panoramic scene and want as much in focus as possible. You would use a smaller aperture to maximize the depth of field. If you want your subject to stand out from the background by being the only thing in focus, you would choose a larger aperture to decrease the depth of field. Keep in mind, a smaller aperture setting allows less light through, so you may have to make other adjustments to compensate, such as adding lights or slowing the shutter speed.
The amount of available light is one of the most important factors in determining the proper aperture setting, which then affects the depth of field. If the subject area is dimly lit, you'll need to use a wide aperture setting which will cause a shallow depth of field. If the subject area is brightly lit, you can set the aperture to a smaller opening, resulting in a deeper depth of field.
For outdoor shooting, you can create a more shallow depth of field by moving into the shade, which will allow you to use a larger aperture setting. Conversely, you can increase the depth of field by moving into the sunlight, which will require a smaller aperture setting. Indoors, controlling the amount of light can also help you control the depth of field. Adding additional light will allow for a smaller aperture setting, resulting in a deeper depth of field; lowering the light level allows for a larger aperture setting to give you a more shallow depth of field.

Shutter speed also affects how much light gets into the camera, which determines how wide you can open your aperture and therefore plays a part in depth of field. A high shutter speed lets less light through. Because less light gets through, you will need to open the aperture setting, which results in a more shallow depth of field. A slow shutter speed allows more light through. With more light, you can use a smaller aperture setting, which results in a deeper depth of field
Controlling Depth of Field
The camera and lighting variables already mentioned interact to control the depth of field. To retain proper exposure levels, you may need to make an adjustment to more than one setting at a time. For example, when using a larger aperture setting, you may have to increase the shutter speed to compensate for the additional light passing through the lens.To utilize depth of field as a creative tool, get to know the different settings on your equipment. Find your camcorder's exposure or iris control and learn how to use it. Try using a higher or lower shutter speed setting to see what effect these have on the depth of field. In cameras with automatic exposure control (or ones with the ability to lock the exposure), adjust the shutter speed first and then set the exposure. Jot down the settings you use so you can recreate the effect later.

Remember that subject distance, combined with zooming, also plays a part in depth of field. Sometimes simply moving the subject, the camera or both while zooming in or out will give you the depth of field desired. Try various distances and zooms and note the results.
Week 1- Camera Shot Sizes (article & video)

Shot size means how much of the scene is included in the picture, and whether it mainly shows the setting, people in the setting, or details of faces and things. It’s important to use different shot sizes in your movie. It’s a way of spelling things out, to make sure that people see exactly the things you want them to see. If you shoot everything in long shot (head to foot) people will probably miss details and expressions which would help them understand the story. Most filmmakers use standard names for shot sizes.
Showing the setting

Extreme long shots or wide shots mainly show the setting: if they include people, they’ll be very small. You can use these kinds of shot as establishing shots at the beginning of a film or a sequence to show where the scene is set.
Showing people in an extreme long shot can make them look lost, lonely or insignificant. (Some people use the term very long shot to refer to a wide shot where you can see people).
Introducing people
To show people in the setting, you need to get closer.
Long shots show people from head to toe. These are good for showing people together, and for showing action.

Medium long shots are closer. They’re sometimes called three-quarter shots because that’s how much of the body they include.

Mid shots (or medium shots) show people from their hips to head.
These kinds of shots are easier to use than closeups, particularly for moving subjects, but they don’t have as much impact.
Using closeups
Don’t make the mistake of shooting the whole film with just mid or long shots: take the time and trouble to use closeups as well. This will give it more impact and help your viewers to understand the story.
Closeups let us see expressions and emotions. There are several kinds of closeup, and as you move closer they get more intense.

A medium
closeup shows the head and shoulders. It’s fairly loose, so the subject
can move a bit. This is a good shot for presentations to camera.

A standard closeup shows the head and maybe a bit of the shoulders.

You can use a big closeup
– which just shows the main features of somebody’s face – to show a
strong emotion like sadness, or to make somebody look scary.

You can even use extreme closeups, which just show part of somebody’s face like the eyes or the mouth.
For an emotional scene, try starting with fairly loose framing (maybe mid shots) and then use bigger and bigger closeups to build up the intensity.
You can also use closeups of things, to show patterns and details.

An insert
is a kind of closeup that shows something important that viewers might
miss. So if you show a mid shot of somebody holding an object or reading
a note, you would follow it with a closeup insert that shows what
they’re holding or reading.
When you film closeups, you need to be very careful about how you frame your shots, and you usually need to keep the camera as still as possible.
Week 1- Shutter Speed in Video (article & video)
We all know the effects of shutter speed on stills, from long exposures more than eight seconds to 1/250th flash sync to 1/2000th action shooting. This flexibility isn't available with video, however, as the slowest possible (though not necessarily available in-camera) speed is the reciprocal of the frame rate. So what should you be thinking about when adjusting your shutter speed? Here are five things to focus on:
1. 24 or 25 Frames per Second
If you're shooting for that filmic look, you should ideally be shooting at 24 frames a second (or 23.976, as is often the case on HDSLRs). If you're looking to shoot for TV, shoot at 25p (that is, 25fps, progressive scan) in PAL countries and 30p in NTSC countries. Usually regional firmware variants enforce this distinction anyway. Why does the frame rate matter? That takes us to point two: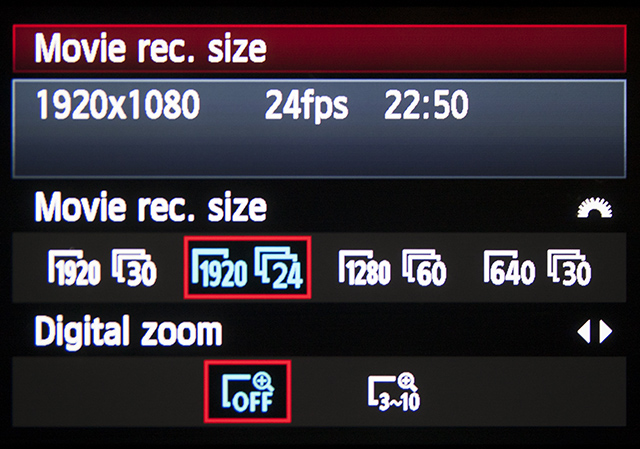
The options available for frame rates on the Canon T3i. In this quick tip, I'm using 1080p24 and 720p60.
2. Shutter Angle and Shutter Speed
Shutter speed is also one of the aspects of the "film look." If you're aiming for cinematic, get used to thinking about shutter angle, and converting between that and shutter speed. Filmic images almost always use a 180° shutter angle, that is, half of the reciprocal of the frame rate. So a 180° shutter at 24p is 1/48 sec. The closest speed to this available on a DSLR is 1/50 sec.The other basic shutter angles are 360°, 90° and 45°. At 24p, these in theory would be 1/24 sec, 1/96 sec, and 1/192 sec. These of course aren't precisely available on DLSRs, so you just have to use the closest one you can find.
Comparison of motion blur at 24p. Note that the 1/50th shutter speed tends to look the most "natural," and the 1/200th looks uncomfortably crisp.
3. Under Normal Circumstances
Moving away from 180° shutter tends to look bad in most circumstances. Using 360° shutter (1/30 at 24p is the closest I can get on a T3i, 1/60th is available at 720p60, however) creates twice as much motion blur as we're used to seeing, and gives the footage a vague quality which can look like bad night-vision video.Going up to 90° and 45° shutter usually gives the picture an uncomfortably crisp look that's usually referred to as the "video look" or looks "video-y." This tends to be the result you get from cheap camcorders, news footage, or daytime TV. Generally not what we're going after!

Crops of the video frames. Left to right: 360°, 180°, 90°, 45°. The length of motion blur relative to the width of the rice grains clearly halves between each interval.
4. Using Angles to Your Advantage
To every rule, there's an exception. Other shutter angles can be used for effect, if done carefully and well. For example, the D-Day beach scene of Saving Private Ryan uses a 45° shutter with a modified film advance timing system in order to recreate the sharp, jerky quality of WWII newsreel.In Gladiator, battle scenes were shot with a 45° shutter to create a stark, staccato feel, adding grit, literally. The dust particles showed up in sharp relief when they would normally blur out. If you're trying to create a dreamy or intoxicated effect, 360° shutter could also be worth a try as long as you have sufficient camera stabilization.
5. High Speed Shooting
Finally, when shooting high-speed for slow motion video, the 180° shutter angle is still the best-looking option. Common sense says that when shooting at 60p to conform to 24p, a 360° shutter would be best to maintain approximately the same level of motion blur as a 180° shutter at 24p. However in practice, this doesn't work, as our eyes understand the slow motion and still expect to see a 180° shutter angle along with the associated reduced motion blur.This is related to a phenomenon called cadence, which is the amount or quality of motion of subjects between frames. Just like the 180° shutter angle itself, our media-saturated brains understand cadence well and adjust accordingly.
Week 1-Video Camera White Balance (article)

Terminology
To confuse the issue, the term "automatic white balance" has two different interpretations. On consumer-level cameras, it means completely automatic. On professional-level cameras, it can mean the white balance operation as described below (which is actually quite manual). This is because in professional situations, a "manual white balance" can mean altering colours using specialised vision processing equipment."Auto-white" means the completely automatic function (no user input at all).
"Manual-white" means the operation described below.
"Colour correction" means any other method of adjusting colours.
How to Perform a Manual White Balance
You should perform this procedure at the beginning of every shoot, and every time the lighting conditions change. It is especially important to re-white balance when moving between indoors and outdoors, and between rooms lit by different kinds of lights. During early morning and late evening, the daylight colour changes quickly and significantly (although your eyes don't notice, your camera will). Do regular white balances during these periods.
You will need a camera with a manual white-balance function. There should be a "white balance" button or switch on your camera.
- If your camera has a filter wheel (or if you use add-on filters), make sure you are using the correct filter for the lighting conditions.
- Point your camera to a pure white subject, so that most of what you're seeing in the viewfinder is white. Opinions vary on just how much white needs to be in the frame - but we've found that about 50-80% of the frame should be fine (Sony recommends 80% of frame width). The subject should be fairly matte, that is, non-reflective.
- Set your exposure and focus.
- Activate the white balance by pressing the button or throwing the
switch. The camera may take a few seconds to complete the operation,
after which you should get a message (or icon) in the viewfinder.
Hopefully this will be telling you that the white balance has succeeded - in this case, the camera will retain it's current colour balance until another white balance is performed.
If the viewfinder message is that the white balance has failed, then you need to find out why. A good camera will give you a clue such as "colour temperature too high" (in which case change filters). Also try opening or closing the iris a little.