Wednesday, 16 April 2025

Week 1- Depth of field - explain further


Depth of field (DoF) is one of the most important concepts in photography. Understanding what DoF is, and knowing what factors affect it, are things all photographers should master. Many photographers know that you can control DoF by adjusting aperture. But did you know that DoF is influenced by other factors too? In this article, I want to explain in simple terms what depth of field is and talk about the ways you can control it.


What is Depth of Field?

Depth of field is the distance between the closest and farthest objects in a photo that appears acceptably sharp. Now your camera can only focus sharply at one point. But the transition from sharp to unsharp is gradual, and the term ‘acceptably sharp’ is a loose one! Without getting too technical, how you will be viewing the image, and at what size you will be looking at it are factors that contribute to how acceptably sharp an image is. It also depends on how good your vision is!

Scientifically, it is based on something called the circle of confusion. This involves more physics than I’m going to get into here! Spencer talks about it in his article “Hyperfocal Distance Explained.” So check that out for more of the technical details if you are so inclined.

In these two sketches, I have tried to illustrate what is meant by a narrow and large DoF. In a photograph with a narrow DoF, only a small slice of the image is in focus. Conversely, with a large DoF, much more of the scene is sharp.

Before I dive into the things that affect depth of field, I wanted to show you the setup I used to take the sample images in this article. Hopefully, this will give you a bit more insight into the photos and a better feel for the distances between the objects I was shooting. To change the camera-subject distance, I moved my tripod closer/farther away from the props. All of the test images were shot with the same camera, a Nikon D500. 


Aperture

Aperture is the opening in your lens that lets light pass through to the sensor. Think of it as a pupil for your lens. It dilates to let more light in, and contracts to restrict light when it is bright. Aperture is probably the first thing most photographers think of when they want to adjust the depth of field.


Large apertures, which correlate to small f-stop numbers, produce a very shallow depth of field. On the other hand, small apertures, or large f-stop numbers, produce images with a large depth of field.


Camera-Subject Distance

Another important factor affecting depth of field is the distance between the camera and the subject. The shorter that distance, the smaller the depth of field. Have you ever tried to take a close-up shot of a flower or insect, but can’t get the entire subject in focus, even with a small aperture? This is because the closer you are to your subject, the shallower the DoF.

Look at these two sets of images. The camera-subject distance in the first group of pictures is 1.5m. After each shot, I stopped down the aperture. The second set has a focus distance of just under a half a meter. Notice two things. In each set of pictures, as the aperture narrows, the DoF increases. In addition, for each pair of photos shot at the same aperture, there is more depth of field when the camera-subject distance is greater. 


 Just a quick note. A variety of depth of field calculators are available online. You can also download DoF apps to your phone. All the DoF values mentioned in this article were calculated using the application Simple DoF Calculator for my iPhone. If you are interested in the actual formulas for calculating depth of field, you can find them here.

Focal Length of the Lens


However, it isn’t fair to compare these two sets of images. The field of view in each collection is very different. The top group of images has taken in much more of the surroundings, and the reindeer are much smaller in the frame.

To make the comparison fair, I took two more shots. The first was taken at a focal length of 35mm and approximately 0.6m away from my focus point (still the eye of the nearest reindeer). For the second image, I moved the camera back, so it was 1.2m away from the subject. Then I zoomed into 70mm and framed the shot so that the head of the deer was approximately the same size and location as in the first shot. It turns out the DoF in both these images is the same. You can see this looking at the acorn in front of the deer’s nose and the snowflake and acorn just behind the nose. In both images, they are equally sharp.


 So why do the two shots look different? Well, two reasons. The first has nothing to do with depth of field. I’m afraid that while I was composing and shooting, the sun went down! So, you must ignore the fact that the background is darker in the second photo. I do apologize for this! Apart from that, the difference lies in the fact that the longer focal length has a narrow angle of view. Thus, a smaller portion of the background fills the frame. The apparent magnification of the background gives the sense that the blur is larger in the photo shot with the longer lens. My article “What is Lens Compression and How to Use It In Your Photos” talks about this in more detail.

So focal length does not actually influence DoF if you adjust the camera-subject distance so that the magnification of your subject is the same.


Week 1- 180 degree rule

180 Degree Axis rule and coverage.

The 180 Degree Rule is an important aspect of the film grammar. The Director's template has a tool for drawing in the 180 degree axis and it is worthwhile to get in the habit of drawing it in. 

 
Crossing the 180 degree axis can be very confusing since the directions established for the viewer is changed. An example of this would be like watching a football game with the runner going to the right and all of a sudden we cut to him running to the left. It would make the viewer wonder if he was running the wrong way or not. 
 
Another aspect of the 180 degree axis is that the closer to the axis the camera is, the more the viewer's point of view resembles the characters, and thus he feels WITH the character. This encourages the important identification with the characters which viewers should feel. 

Once you establish who is on the left and right, you should not cross the axis, otherwise your shots would confuse the audience.

Week 1- 180- degree rule - revisited

Week 1 - Camera intermediate

Week 1- Depth of Field further explained

Week 1- 180 degree rule of axis (article & video)


The 180 degree rule, looking space and eyeline match


  • Follow these rules so that your shots will make sense together
  • Keep all your camera positions on one side of an imaginary line
  • Frame your shots carefully to show where people are looking
When you film a scene using separate shots, it’s important that people understand where everything in the scene is. You can use the 180 degree rule, together with looking space and eyeline match, to help them.

The 180 degree rule

Imagine you’re looking at a scene from the side. You can see the whole scene. If you look at one character, they are on the left hand side of the scene facing right. The other character is on the right side of the scene facing left.
You could just show your scene in long shot, but that would mean we couldn’t see facial expressions, or details of what characters are doing, very well. It would also be quite boring because the camera position doesn’t change.

It’s much more interesting if you get closer and use separate shots, such as mid shots and closeups. It’s best if the camera moves round so it’s almost full on to the characters. This way we can see their expressions and identify with their emotions.

Shooting like this – first in one direction, then in the other direction – is called shot reverse shot.
The shots work together because the camera is still (just) on the same side of the characters as it was in the long shot. When the shots are edited together, we understand that they are looking at each other, because they are looking in the same direction as they were in Shot 1.
To make sure this works, we need to imagine a line between the two characters. This is called the axis of action.
Then we need to keep the camera on one side of that line. If you break the rule you have ‘crossed the line‘. In the diagram below, the camera needs to stay in the blue shaded area. (The rule also applies if the character is looking at a thing rather than another person.)
This is called the 180 degree rule because the camera can’t move more than 180 degrees (half a circle) around the characters.


Week 1 - Shutter Speed explained (external video)

Week 1-Video Camera White Balance (article)

White balance basically means colour balance. It is a function which gives the camera a reference to "true white" — it tells the camera what the colour white looks like, so the camera will record it correctly. Since white light is the sum of all other colours, the camera will then display all colours correctly. Incorrect white balance shows up as pictures with orange or blue tints, as demonstrated by the following examples:


Most consumer-level camcorders have an "auto-white balance" feature, and this is how most amateurs operate. The camera performs it's own white balance without any input from the operator. In fact, very few home-video users are aware of it's existence. Unfortunately, the auto-white balance is not particularly reliable and it is usually preferable to perform this function manually.

Terminology

To confuse the issue, the term "automatic white balance" has two different interpretations. On consumer-level cameras, it means completely automatic. On professional-level cameras, it can mean the white balance operation as described below (which is actually quite manual). This is because in professional situations, a "manual white balance" can mean altering colours using specialised vision processing equipment.

"Auto-white" means the completely automatic function (no user input at all).
"Manual-white" means the operation described below.
"Colour correction" means any other method of adjusting colours.

How to Perform a Manual White Balance

You should perform this procedure at the beginning of every shoot, and every time the lighting conditions change. It is especially important to re-white balance when moving between indoors and outdoors, and between rooms lit by different kinds of lights. During early morning and late evening, the daylight colour changes quickly and significantly (although your eyes don't notice, your camera will). Do regular white balances during these periods.


 You will need a camera with a manual white-balance function. There should be a "white balance" button or switch on your camera.
  1. If your camera has a filter wheel (or if you use add-on filters), make sure you are using the correct filter for the lighting conditions.
  2. Point your camera to a pure white subject, so that most of what you're seeing in the viewfinder is white. Opinions vary on just how much white needs to be in the frame - but we've found that about 50-80% of the frame should be fine (Sony recommends 80% of frame width). The subject should be fairly matte, that is, non-reflective.
  3. Set your exposure and focus.
  4. Activate the white balance by pressing the button or throwing the switch. The camera may take a few seconds to complete the operation, after which you should get a message (or icon) in the viewfinder.
    Hopefully this will be telling you that the white balance has succeeded - in this case, the camera will retain it's current colour balance until another white balance is performed.
    If the viewfinder message is that the white balance has failed, then you need to find out why. A good camera will give you a clue such as "colour temperature too high" (in which case change filters). Also try opening or closing the iris a little.

Week 1- Depth of Field (article)

How to control the depth of field so your subject stands out sharply.
If you're like most videographers, you want to make your shots look as good as possible. Managing which areas of your shots are in and out of focus can be one of the most valuable tools in your arsenal. And controlling the depth of field ultimately determines your focus area. By understanding how your camcorder's lens operates, and with a little practice, you will be on your way to more interesting and creative shots.

What is Depth of Field?

Depth of field is the area of an image that appears in focus. Camera settings, the amount of light and your equipment's technical specifications are all factors that can impact depth of field, making it deep or shallow.

First, it is important to understand that whenever a lens is involved, there is only one plane of exact focus. There is, though, an area of acceptable focus in front of and behind this plane. In a shallow depth of field, only the subject and a small area in front of and behind it will be in sharp focus. A deep depth of field results in objects farther away from the focus plane lying within acceptable focus range


Controlling the depth of field allows you to make your subject stand out sharply from the background, or to put as much of the shot as possible in focus. For example, when shooting your son playing violin in the midst of the string section, you may want him to stand out from the rest of the orchestra. On the other hand, you might want the entire orchestra to be in focus, which may not be a trivial task in low-light situations. Most consumer-level camcorders have very deep depths of field in most shooting situations.

What Affects Depth of Field?

While there are many ways to alter your camcorder's depth of field, there are really only two variables that determine depth of field: focal length and aperture. Focal length is a function of your camcorder's lens and is changed when you zoom in or out on a subject. You can, therefore, easily change the depth of field of your shot by simply zooming. The aperture, on the other hand, is a bit more complicated to control, but is easy to understand. The aperture or iris simply controls how much light gets into your camcorder. You can manually control aperture settings, but the shutter speed and the amount of light in a scene will always be an influence on these settings as well.

Focal Length

Let's begin by examining focal length. The focal length of your lens directly affects depth of field. When shooting a wide angle shot, the focal length of the lens is relatively short and will have a deeper depth of field. If you zoom in, the focal length gets longer, and the shot will have a more shallow depth of field

If you want your subject to stand out in a crowded scene, you could use a long focal length lens, thereby decreasing the depth of field and making your subject the only area of focus. A lens with a short focal length is typically called "wide-angle" and a long focal-length lens is known as a "telephoto." In other words, when you are zoomed in, your lens has a longer focal length and therefore has a more shallow depth of field. Subject distance from the lens and from the background also plays a part in depth of field


For example, decrease the distance between the camera and your subject and more of your shot will be in focus. To have only your subject in focus, increase the distance between your subject and the background, allowing the background to fall out of the depth of field.

Aperture (Iris)

The aperture setting determines the size of the opening (iris) that lets light through to the CCD. A small aperture setting results in a deeper depth of field and a large aperture setting provides a shallow depth of field. Say, for example, that you're shooting a panoramic scene and want as much in focus as possible. You would use a smaller aperture to maximize the depth of field. If you want your subject to stand out from the background by being the only thing in focus, you would choose a larger aperture to decrease the depth of field. Keep in mind, a smaller aperture setting allows less light through, so you may have to make other adjustments to compensate, such as adding lights or slowing the shutter speed.


The amount of available light is one of the most important factors in determining the proper aperture setting, which then affects the depth of field. If the subject area is dimly lit, you'll need to use a wide aperture setting which will cause a shallow depth of field. If the subject area is brightly lit, you can set the aperture to a smaller opening, resulting in a deeper depth of field.

For outdoor shooting, you can create a more shallow depth of field by moving into the shade, which will allow you to use a larger aperture setting. Conversely, you can increase the depth of field by moving into the sunlight, which will require a smaller aperture setting. Indoors, controlling the amount of light can also help you control the depth of field. Adding additional light will allow for a smaller aperture setting, resulting in a deeper depth of field; lowering the light level allows for a larger aperture setting to give you a more shallow depth of field.


Shutter speed also affects how much light gets into the camera, which determines how wide you can open your aperture and therefore plays a part in depth of field. A high shutter speed lets less light through. Because less light gets through, you will need to open the aperture setting, which results in a more shallow depth of field. A slow shutter speed allows more light through. With more light, you can use a smaller aperture setting, which results in a deeper depth of field

Controlling Depth of Field

The camera and lighting variables already mentioned interact to control the depth of field. To retain proper exposure levels, you may need to make an adjustment to more than one setting at a time. For example, when using a larger aperture setting, you may have to increase the shutter speed to compensate for the additional light passing through the lens.

To utilize depth of field as a creative tool, get to know the different settings on your equipment. Find your camcorder's exposure or iris control and learn how to use it. Try using a higher or lower shutter speed setting to see what effect these have on the depth of field. In cameras with automatic exposure control (or ones with the ability to lock the exposure), adjust the shutter speed first and then set the exposure. Jot down the settings you use so you can recreate the effect later.

Remember that subject distance, combined with zooming, also plays a part in depth of field. Sometimes simply moving the subject, the camera or both while zooming in or out will give you the depth of field desired. Try various distances and zooms and note the results.


Week 1- Shutter Speed in Video (article & video)

When talking about video, many people refer the "cinematic" or "videoish" looks. Cinematic is in. Everyone wants to make sure their videos look like they came from a Hollywood backlot. One of the most basic methods of changing the look is by controlling the shutter speed.
We all know the effects of shutter speed on stills, from long exposures more than eight seconds to 1/250th flash sync to 1/2000th action shooting. This flexibility isn't available with video, however, as the slowest possible (though not necessarily available in-camera) speed is the reciprocal of the frame rate. So what should you be thinking about when adjusting your shutter speed? Here are five things to focus on:
If you're shooting for that filmic look, you should ideally be shooting at 24 frames a second (or 23.976, as is often the case on HDSLRs). If you're looking to shoot for TV, shoot at 25p (that is, 25fps, progressive scan) in PAL countries and 30p in NTSC countries. Usually regional firmware variants enforce this distinction anyway. Why does the frame rate matter? That takes us to point two:

videoshutter_01
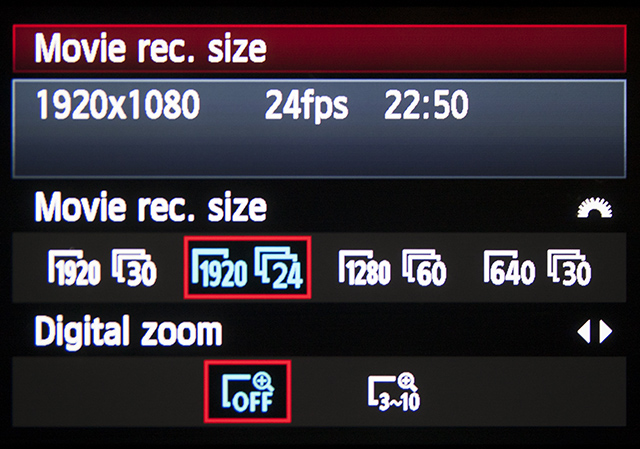
The options available for frame rates on the Canon T3i. In this quick tip, I'm using 1080p24 and 720p60.

Shutter speed is also one of the aspects of the "film look." If you're aiming for cinematic, get used to thinking about shutter angle, and converting between that and shutter speed. Filmic images almost always use a 180° shutter angle, that is, half of the reciprocal of the frame rate. So a 180° shutter at 24p is 1/48 sec. The closest speed to this available on a DSLR is 1/50 sec.
Shutter angle originally was used with rotary shutters, but now must be translated to curtain shutters. 360° translates to a shutter speed of 1/the frame rate. 180° is 1/double the frame rate, and gets faster from there.
At 30p, it would be 1/60 sec. This look has been socially imprinted on us from decades of movies shot at 24 frames with a 180° shutter, and it's a simple method of putting more apparent production value on-screen.
The other basic shutter angles are 360°, 90° and 45°. At 24p, these in theory would be 1/24 sec, 1/96 sec, and 1/192 sec. These of course aren't precisely available on DLSRs, so you just have to use the closest one you can find.
Comparison of motion blur at 24p. Note that the 1/50th shutter speed tends to look the most "natural," and the 1/200th looks uncomfortably crisp.

Moving away from 180° shutter tends to look bad in most circumstances. Using 360° shutter (1/30 at 24p is the closest I can get on a T3i, 1/60th is available at 720p60, however) creates twice as much motion blur as we're used to seeing, and gives the footage a vague quality which can look like bad night-vision video.
Going up to 90° and 45° shutter usually gives the picture an uncomfortably crisp look that's usually referred to as the "video look" or looks "video-y." This tends to be the result you get from cheap camcorders, news footage, or daytime TV. Generally not what we're going after!
videoshutter_02
Crops of the video frames. Left to right: 360°, 180°, 90°, 45°. The length of motion blur relative to the width of the rice grains clearly halves between each interval.
To every rule, there's an exception. Other shutter angles can be used for effect, if done carefully and well. For example, the D-Day beach scene of Saving Private Ryan uses a 45° shutter with a modified film advance timing system in order to recreate the sharp, jerky quality of WWII newsreel.
In Gladiator, battle scenes were shot with a 45° shutter to create a stark, staccato feel, adding grit, literally. The dust particles showed up in sharp relief when they would normally blur out. If you're trying to create a dreamy or intoxicated effect, 360° shutter could also be worth a try as long as you have sufficient camera stabilization.


Finally, when shooting high-speed for slow motion video, the 180° shutter angle is still the best-looking option. Common sense says that when shooting at 60p to conform to 24p, a 360° shutter would be best to maintain approximately the same level of motion blur as a 180° shutter at 24p. However in practice, this doesn't work, as our eyes understand the slow motion and still expect to see a 180° shutter angle along with the associated reduced motion blur.
This is related to a phenomenon called cadence, which is the amount or quality of motion of subjects between frames. Just like the 180° shutter angle itself, our media-saturated brains understand cadence well and adjust accordingly.

Week 1- Camera Shot Sizes (article & video)


Shot size means how much of the scene is included in the picture, and whether it mainly shows the setting, people in the setting, or details of faces and things. It’s important to use different shot sizes in your movie. It’s a way of spelling things out, to make sure that people see exactly the things you want them to see. If you shoot everything in long shot (head to foot) people will probably miss details and expressions which would help them understand the story. Most filmmakers use standard names for shot sizes.


Showing the setting


Extreme long shots or wide shots mainly show the setting: if they include people, they’ll be very small. You can use these kinds of shot as establishing shots at the beginning of a film or a sequence to show where the scene is set.

Showing people in an extreme long shot can make them look lost, lonely or insignificant. (Some people use the term very long shot to refer to a wide shot where you can see people).

Introducing people

To show people in the setting, you need to get closer.

Man in long shot
Long shots show people from head to toe. These are good for showing people together, and for showing action.

Medium long shot
Medium long shots are closer. They’re sometimes called three-quarter shots because that’s how much of the body they include.

Mid shot
Mid shots (or medium shots) show people from their hips to head.

These kinds of shots are easier to use than closeups, particularly for moving subjects, but they don’t have as much impact.

Using closeups

Don’t make the mistake of shooting the whole film with just mid or long shots: take the time and trouble to use closeups as well. This will give it more impact and help your viewers to understand the story.

Closeups let us see expressions and emotions. There are several kinds of closeup, and as you move closer they get more intense.

Medium closeup
A medium closeup shows the head and shoulders. It’s fairly loose, so the subject can move a bit. This is a good shot for presentations to camera.

Closeup
A standard closeup shows the head and maybe a bit of the shoulders.

Big closeup
You can use a big closeup – which just shows the main features of somebody’s face – to show a strong emotion like sadness, or to make somebody look scary.

Extreme closeup
You can even use extreme closeups, which just show part of somebody’s face like the eyes or the mouth.

For an emotional scene, try starting with fairly loose framing (maybe mid shots) and then use bigger and bigger closeups to build up the intensity.

You can also use closeups of things, to show patterns and details.

Insert
An insert is a kind of closeup that shows something important that viewers might miss. So if you show a mid shot of somebody holding an object or reading a note, you would follow it with a closeup insert that shows what they’re holding or reading.

When you film closeups, you need to be very careful about how you frame your shots, and you usually need to keep the camera as still as possible.


Week 1- Types of Shots (external video)

Week 1- NX5 camera basics pt.2 (external video)

Week 1- NX5 camera basics (External Video)

Week 1- Understanding Color Temperature (article + video)

Colour Temperature Chart

Colour temperature is a standard method of describing colours for use in a range of situations and with different equipment. Colour temperatures are normally expressed in units called kelvins (K). Note that the term degrees kelvin is often used but is not technically correct (see below).

Technically speaking...

Colour temperature means the temperature of an ideal black body radiator at which the colour of the light source and the black body are identical. (A black body is a theoretical radiator and absorber of energy at all electromagnetic wavelengths.)

Colour Temperature in Video

For video operations the relevant temperatures range from around 2,000K to 8,000K — these are common lighting conditions. In practical terms this usually means selecting lights, gels and filters which are most appropriate to the prevailing light or to create a particular colour effect. For example, a camera operator will select a "5600K filter" to use outside in the middle of a sunny day.

Terminology

  • When referring to the unit kelvin, it is not capitalised unless it is the first word of a sentence. The plural is kelvins (e.g. "The light source is approximately 3200 kelvins").
  • The symbol is a capital K (e.g. "The light source is approximately 3200K").
  • When referring to the Kelvin scale, it is capitalised (e.g. "The Kelvin scale is named after William Thomson (1824 – 1907), also known as Lord Kelvin".

Degrees kelvin

According to the The International System of Units (SI), colour temperatures are stated in kelvins, not in degrees Kelvin. The "degrees" part of the name was made obsolete in 1967. However, the "degrees" reference has remained in common use in media industries.


Week 1 -White Balancing on Sony NX -5P (lecture instruction)